- Welcome to Privacera
- Introduction to Privacera
- Governed Data Stewardship
- Concepts in Governed Data Stewardship
- Prerequisites and planning
- Tailor Governed Data Stewardship
- Overview to examples by role
- PrivaceraCloud setup
- PrivaceraCloud data access methods
- Create PrivaceraCloud account
- Log in to PrivaceraCloud with or without SSO
- Connect applications to PrivaceraCloud
- Connect applications to PrivaceraCloud with the setup wizard
- Connect Azure Data Lake Storage Gen 2 (ADLS) to PrivaceraCloud
- Connect Amazon Textract to PrivaceraCloud
- Connect Athena to PrivaceraCloud
- Connect AWS Lake Formation on PrivaceraCloud
- Get started with AWS Lake Formation
- Create IAM Role for AWS Lake Formation connector
- Connect AWS Lake Formation application on PrivaceraCloud
- Create AWS Lake Formation connectors for multiple AWS regions
- Configuring audit logs for the AWS Lake Formation on PrivaceraCloud
- How to validate a AWS Lake Formation connector
- AWS Lake Formation FAQs for Pull mode
- AWS Lake Formation FAQs for Push mode
- Azure Data Factory Integration with Privacera Enabled Databricks Cluster
- Connect Google BigQuery to PrivaceraCloud
- Connect Cassandra to PrivaceraCloud for Discovery
- Connect Collibra to PrivaceraCloud
- Connect Databricks to PrivaceraCloud
- Connect Databricks SQL to PrivaceraCloud
- Connect Databricks to PrivaceraCloud
- Configure Databricks SQL PolicySync on PrivaceraCloud
- Databricks SQL fields on PrivaceraCloud
- Databricks SQL Masking Functions
- Connect Databricks SQL to Hive policy repository on PrivaceraCloud
- Enable Privacera Encryption services in Databricks SQL on PrivaceraCloud
- Example: Create basic policies for table access
- Connect Databricks Unity Catalog to PrivaceraCloud
- Enable Privacera Access Management for Databricks Unity Catalog
- Enable Data Discovery for Databricks Unity Catalog
- Databricks Unity Catalog connector fields for PolicySync on PrivaceraCloud
- Configure Audits for Databricks Unity Catalog on PrivaceraCloud
- Databricks Partner Connect - Quickstart for Unity Catalog
- Connect Dataproc to PrivaceraCloud
- Connect Dremio to PrivaceraCloud
- Connect DynamoDB to PrivaceraCloud
- Connect Elastic MapReduce from Amazon application to PrivaceraCloud
- Connect EMR application
- EMR Spark access control types
- PrivaceraCloud configuration
- AWS IAM roles using CloudFormation setup
- Create a security configuration
- Create EMR cluster
- Kerberos required for EMR FGAC or OLAC
- Create EMR cluster using CloudFormation setup (Recommended)
- Create EMR cluster using CloudFormation EMR templates
- EMR template: Spark_OLAC, Hive, PrestoDB (for EMR versions 5.33.1)
- EMR template: Spark_FGAC, Hive, PrestoDB (for EMR versions 5.33.1)
- EMR Template for Multiple Master Node: Spark_OLAC, Hive, PrestoDB (for EMR versions 5.33.1 )
- EMR Template for Multiple Master Node: Spark_FGAC, Hive, PrestoDB (for EMR versions 5.33.1 )
- EMR Template: Spark_OLAC, Hive, Trino (for EMR versions 6.11.0 )
- EMR Template: Spark_FGAC, Hive, Trino (for EMR versions 6.11.0 )
- EMR template: Spark_OLAC, Hive, Trino (for EMR versions 6.4.0 and above)
- EMR Template for Multiple Master Node: Spark_OLAC, Hive, Trino (for EMR version 6.4.0 and above)
- EMR template: Spark_OLAC, Hive, PrestoSQL (for EMR versions 6.x to 6.3.1)
- EMR template: Spark_FGAC, Hive, Trino (for EMR versions 6.4.0 and above)
- EMR Template for Multiple Master Node: Spark_FGAC, Hive, Trino (for EMR version 6.4.0 and above)
- EMR template: Spark_FGAC, Hive, PrestoSQL (for EMR versions 6.x to 6.3.1)
- Create EMR cluster using CloudFormation AWS CLI
- Create CloudFormation stack
- Create EMR cluster using CloudFormation EMR templates
- Manually create EMR cluster using AWS EMR console
- EMR Native Ranger Integration with PrivaceraCloud
- Connect EMRFS S3 to PrivaceraCloud
- Connect Files to PrivaceraCloud
- Connect Google Cloud Storage to PrivaceraCloud
- Connect Glue to PrivaceraCloud
- Integrate Google Looker from AWS Athena to PrivaceraCloud
- Connect Kinesis to PrivaceraCloud
- Connect Lambda to PrivaceraCloud
- Connect MS SQL to PrivaceraCloud
- Connect MySQL to PrivaceraCloud for Discovery
- Connect Open Source Apache Spark to PrivaceraCloud
- Connect Oracle to PrivaceraCloud for Discovery
- Connect PostgreSQL to PrivaceraCloud
- Connect Power BI to PrivaceraCloud
- Connect Presto to PrivaceraCloud
- Connect Redshift to PrivaceraCloud
- Redshift Spectrum PrivaceraCloud overview
- Connect Snowflake to PrivaceraCloud
- Starburst Enterprise with PrivaceraCloud
- Connect Starbrust Trino to PrivaceraCloud
- Connect Starburst Enterprise Presto to PrivaceraCloud
- Connect S3 to PrivaceraCloud
- Connect Synapse to PrivaceraCloud
- Connect Trino to PrivaceraCloud
- Starburst Trino and Trino SQL command permissions
- Starburst Trino and Trino SQL command permissions - Iceberg connector
- Connect Vertica to PrivaceraCloud
- Manage applications on PrivaceraCloud
- Connect users to PrivaceraCloud
- Data sources on PrivaceraCloud
- PrivaceraCloud custom configurations
- Access AWS S3 buckets from multiple AWS accounts on PrivaceraCloud
- Configure multiple JWTs for EMR
- Access cross-account SQS queue for PostgreSQL audits on PrivaceraCloud
- AWS Access with IAM role on PrivaceraCloud
- Databricks cluster deployment matrix with Privacera plugin
- Whitelist py4j security manager via S3 or DBFS
- General functions in PrivaceraCloud settings
- Cross account IAM role for Databricks
- Operational status of PrivaceraCloud and RSS feed
- Troubleshooting the Databricks Unity Catalog tutorial
- PrivaceraCloud Setup (Applicable only for Data Plane configuration)
- Privacera Platform installation
- Plan for Privacera Platform
- Privacera Platform overview
- Privacera Platform installation overview
- Privacera Platform deployment size
- Privacera Platform installation prerequisites
- Choose a cloud provider
- Select a deployment type
- Configure proxy for Privacera Platform
- Prerequisites for installing Privacera Platform on Kubernetes
- Default Privacera Platform port numbers
- Required environment variables for installing Privacera Platform
- Privacera Platform system requirements for Azure
- Prerequisites for installing Privacera Manager on AWS
- Privacera Platform system requirements for Docker in GCP
- Privacera Platform system requirements for Docker in AWS
- Privacera Platform system requirements for Docker in Azure
- Privacera Platform system requirements for Google Cloud Platform (GCP)
- System requirements for Privacera Manager Host in GKE
- System requirements for Privacera Manager Host in EKS
- System requirements for Privacera Manager Host in AKS
- Install Privacera Platform
- Download the Privacera Platform installation packages
- Privacera Manager overview
- Install Privacera Manager on Privacera Platform
- Install Privacera Platform using an air-gapped install
- Upgrade Privacera Manager
- Troubleshoot Privacera Platform installation
- Validate Privacera Platform installation
- Common errors and warnings in Privacera Platform YAML config files
- Ansible Kubernetes Module does not load on Privacera Platform
- Unable to view Audit Fluentd audits on Privacera Platform
- Unable to view Audit Server audits on Privacera Platform
- No space for Docker images on Privacera Platform
- Unable to see metrics on Grafana dashboard
- Increase storage for Privacera PolicySync on Kubernetes
- Permission denied errors in PM Docker installation
- Non-portal users can access restricted Privacera Platform resources
- Storage issue in Privacera Platform UserSync and PolicySync
- Privacera Manager not responding
- Unable to Connect to Docker
- Privacera Manager unable to connect to Kubernetes Cluster
- Unable to initialize the Discovery Kubernetes pod
- Unable to upgrade from 4.x to 5.x or 6.x due to Zookeeper snapshot issue
- 6.5 Platform Installation fails with invalid apiVersion
- Database lockup in Docker
- Remove the WhiteLabel Error Page on Privacera Platform
- Unable to start the Privacera Platform portal service
- Connect portal users to Privacera Platform
- Connect Privacera Platform portal users from LDAP
- Set up portal SSO for Privacera Platform with OneLogin using SAML
- Set up portal SSO for Privacea Platform with Okta using SAML
- Set up portal SSO for Privacera Platform with Okta using OAuth
- Set up portal SSO for Privacera Platform with AAD using SAML
- Set up portal SSO for Privacera Platform with PingFederate
- Change default user role to "anonymous" on Privacera Platform for SSO
- Generate an Okta Identity Provider metadata file and URL
- Connect applications to Privacera Platform for Access Management
- Connect applications to Privacera Platform using the Data Access Server
- Data Access Server overview
- Integrate AWS with Privacera Platform using the Data Access Server
- Integrate GCS and GCP with Privacera Platform using the Data Access Server
- Integrate Google Looker from AWS Athena with Privacera Platform
- Integrate ADLS with Privacera Platform using the Data Access Server
- Access Kinesis with the Data Access Server on Privacera Platform
- Access Firehose with Data Access Server on Privacera Platform
- Use DynamoDB with Data Access Server on Privacera Platform
- Connect MinIO to Privacera Platform using the Data Access Server
- Use Athena with Data Access Server on Privacera Platform
- Custom Data Access Server properties
- Connect applications to Privacera Platform using the Privacera Plugin
- Overview of Privacera plugins for Databricks
- Connect AWS EMR with Native Apache Ranger to Privacera Platform
- Configure Databricks Spark Fine-Grained Access Control Plugin [FGAC] [Python, SQL]
- Configure Databricks Spark Object-level Access Control Plugin
- Connect Dremio to Privacera Platform via plugin
- Connect Amazon EKS to Privacera Platform using Privacera plugin
- Configure EMR with Privacera Platform
- EMR user guide for Privacera Platform
- Connect GCP Dataproc to Privacera Platform using Privacera plugin
- Connect Kafka datasource via plugin to Privacera Platform
- Connect PrestoSQL standalone to Privacera Platform using Privacera plugin
- Connect Spark standalone to Privacera Platform using the Privacera plugin
- Privacera Spark plugin versus Open-source Spark plugin
- Connect Starburst Enterprise to Privacera Platform via plugin
- Connect Starburst Trino Open Source to Privacera Platform via Plug-In
- Connect Trino Open Source to Privacera Platform via plugin
- Connect applications to Privacera Platform using the Data Access Server
- Configure AuditServer on Privacera Platform
- Configure Solr destination on Privacera Platform
- Enable Solr authentication on Privacera Platform
- Solr properties on Privacera Platform
- Configure Kafka destination on Privacera Platform
- Enable Pkafka for real-time audits in Discovery on Privacera Platform
- AuditServer properties on Privacera Platform
- Configure Fluentd audit logging on Privacera Platform
- Configure High Availability for Privacera Platform
- Configure Privacera Platform system security
- Privacera Platform system security
- Configure SSL for Privacera Platform
- Enable CA-signed certificates on Privacera Platform
- Enable self-signed certificates on Privacera Platform
- Upload custom SSL certificates on Privacera Platform
- Custom Crypto properties on Privacera Platform
- Enable password encryption for Privacera Platform services
- Authenticate Privacera Platform services using JSON Web Tokens
- Configure JSON Web Tokens for Databricks
- Configure JSON Web Tokens for EMR FGAC Spark
- Custom configurations for Privacera Platform
- Privacera Platform system configuration
- Add custom properties using Privacera Manager on Privacera Platform
- Privacera Platform system properties files overview
- Add domain names for Privacera service URLs on Privacera Platform
- Configure AWS Aurora DB (PostgreSQL/MySQL) on Privacera Platform
- Configure Azure PostgreSQL on Privacera Platform
- Spark Standalone properties on Privacera Platform
- AWS Data Access Server properties on Privacera Platform
- Configure proxy for Privacera Platform
- Configure Azure MySQL on Privacera Platform
- System-level settings for Zookeeper on Privacera Platform
- Configure service name for Databricks Spark plugin on Privacera Platform
- Migrate Privacera Manager from one instance to another
- Restrict access in Kubernetes on Privacera Platform
- System-level settings for Grafana on Privacera Platform
- System-level settings for Ranger KMS on Privacera Platform
- Generate verbose logs on Privacera Platform
- System-level settings for Spark on Privacera Platform
- System-level settings for Azure ADLS on Privacera Platform
- Override Databricks region URL mapping for Privacera Platform on AWS
- Configure Privacera Platform system properties
- EMR custom properties
- Merge Kubernetes configuration files
- Scala Plugin properties on Privacera Platform
- System-level settings for Trino Open Source on Privacera Platform
- System-level settings for Kafka on Privacera Platform
- System-level settings for Graphite on Privacera Platform
- System-level settings for Spark plugin on Privacera Platform
- Add custom Spark configuration for Databricks on Privacera Platform
- Create CloudFormation stack
- Configure pod topology for Kubernetes on Privacera Platform
- Configure proxy for Kubernetes on Privacera Platform
- Externalize access to Privacera Platform services with NGINX Ingress
- Custom Privacera Platform portal properties
- Add Data Subject Rights
- Enable or disable the Data Sets menu
- Kubernetes RBAC
- Spark FGAC properties
- Audit Fluentd properties on Privacera Platform
- Switch from Kinesis to Kafka for Privacera Discovery queuing on AWS with Privacera Platform
- Privacera Platform on AWS overview
- Privacera Platform Portal overview
- AWS Identity and Access Management (IAM) on Privacera Platform
- Set up AWS S3 MinIO on Privacera Platform
- Integrate Privacera services in separate VPC
- Install Docker and Docker compose (AWS-Linux-RHEL) on Privacera Platform
- Configure EFS for Kubernetes on AWS for Privacera Platform
- Multiple AWS accounts support in DataServer
- Multiple AWS S3 IAM role support in Data Access Server
- Enable AWS CLI on Privacera Platform
- Configure S3 for real-time scanning on Privacera Platform
- Multiple AWS account support in Dataserver using Databricks on Privacera Platform
- Enable AWS CLI
- AWS S3 Commands - Ranger Permission Mapping
- Plan for Privacera Platform
- How to get support
- Access Management
- Get started with Access Management
- Users, groups, and roles
- UserSync
- Add UserSync connectors
- UserSync connector properties on Privacera Platform
- UserSync connector fields on PrivaceraCloud
- UserSync system properties on Privacera Platform
- About Ranger UserSync
- Customize user details on sync
- UserSync integrations
- SCIM Server User-Provisioning on PrivaceraCloud
- Azure Active Directory UserSync integration on Privacera Platform
- LDAP UserSync integration on Privacera Platform
- Policies
- How polices are evaluated
- General approach to validating policy
- Resource policies
- About service groups on PrivaceraCloud
- Service/Service group global actions
- Create resource policies: general steps
- About secure database views
- PolicySync design on Privacera Platform
- PolicySync design and configuration on Privacera Platform
- Relationships: policy repository, connector, and datasource
- PolicySync topologies
- Connector instance directory/file structure
- Required basic PolicySync topology: always at least one connector instance
- Optional topology: multiple connector instances for Kubernetes pods and Docker containers
- Recommended PolicySync topology: individual policy repositories for individual connectors
- Optional encryption of property values
- Migration to PolicySync v2 on Privacera Platform 7.2
- Databricks SQL connector for PolicySync on Privacera Platform
- Databricks SQL connector properties for PolicySync on Privacera Platform
- Databricks Unity Catalog connector for PolicySync on Privacera Platform
- Databricks Unity Catalog connector properties for PolicySync on Privacera Platform
- Dremio connector for PolicySync on Privacera Platform
- Dremio connector properties for PolicySync on Privacera Platform
- Configure AWS Lake Formation on Privacera Platform
- Get started with AWS Lake Formation
- Create IAM Role for AWS Lake Formation connector for Platform
- Configure AWS Lake Formation connector on Privacera Platform
- Create AWS Lake Formation connectors for multiple AWS regions for Platform
- Setup audit logs for AWS Lake Formation on Platform
- How to validate a AWS Lake Formation connector
- AWS Lake Formation FAQs for Pull mode
- AWS Lake Formation FAQs for Push mode
- AWS Lake Formation Connector Properties
- Google BigQuery connector for PolicySync on Privacera Platform
- BigQuery connector properties for PolicySync on Privacera Platform
- Microsoft SQL Server connector for PolicySync on Privacera Platform
- Microsoft SQL connector properties for PolicySync on Privacera Platform
- PostgreSQL connector for PolicySync on Privacera Platform
- PostgreSQL connector properties for PolicySync on Privacera Platform
- Power BI connector for PolicySync
- Power BI connector properties for PolicySync on Privacera Platform
- Redshift and Redshift Spectrum connector for PolicySync
- Redshift and Redshift Spectrum connector properties for PolicySync on Privacera Platform
- Snowflake connector for PolicySync on Privacera Platform
- Snowflake connector properties for PolicySync on Privacera Platform
- PolicySync design and configuration on Privacera Platform
- Configure resource policies
- Configure ADLS resource policies
- Configure AWS S3 resource policies
- Configure Athena resource policies
- Configure Databricks resource policies
- Configure DynamoDB resource policies
- Configure Files resource policies
- Configure GBQ resource policies
- Configure GCS resource policies
- Configure Glue resource policies
- Configure Hive resource policy
- Configure Lambda resource policies
- Configure Kafka resource policies
- Configure Kinesis resource policies
- Configure MSSQL resource policies
- Configure PowerBI resource policies
- Configure Presto resource policies
- Configure Postgres resource policies
- Configure Redshift resource policies
- Configure Snowflake resource policies
- Configure Policy with Attribute-Based Access Control (ABAC) on PrivaceraCloud
- Attribute-based access control (ABAC) macros
- Configure access policies for AWS services on Privacera Platform
- Configure policy with conditional masking on Privacera Platform
- Create access policies for Databricks on Privacera Platform
- Order of precedence in PolicySync filter
- Example: Manage access to Databricks SQL with Privacera
- Service/service group global actions on the Resource Policies page
- Tag policies
- Policy configuration settings
- Security zones
- Manage Databricks policies on Privacera Platform
- Databricks Unity Catalog row filtering and native masking on PrivaceraCloud
- Use a custom policy repository with Databricks
- Configure policy with Attribute-Based Access Control on Privacera Platform
- Create Databricks policies on Privacera Platform
- Example: Create basic policies for table access
- Examples of access control via programming
- Secure S3 via Boto3 in Databricks notebook
- Other Boto3/Pandas examples to secure S3 in Databricks notebook with PrivaceraCloud
- Secure Azure file via Azure SDK in Databricks notebook
- Control access to S3 buckets with AWS Lambda function on PrivaceraCloud or Privacera Platform
- Service Explorer
- Audits
- Required permissions to view audit logs on Privacera Platform
- About PolicySync access audit records and policy ID on Privacera Platform
- View audit logs
- View PEG API audit logs
- Generate audit logs using GCS lineage
- Configure Audit Access Settings on PrivaceraCloud
- Configure AWS RDS PostgreSQL instance for access audits
- Accessing PostgreSQL Audits in Azure
- Accessing PostgreSQL Audits in GCP
- Configure Microsoft SQL server for database synapse audits
- Examples of audit search
- Reports
- Discovery
- Get started with Discovery
- Planning for Privacera Discovery
- Install and Enable Privacera Discovery
- Set up Discovery on Privacera Platform
- Set up Discovery on AWS for Privacera Platform
- Set up Discovery on Azure for Privacera Platform
- Set up Discovery on Databricks for Privacera Platform
- Set up Discovery on GCP for Privacera Platform
- Enable Pkafka for real-time audits in Discovery on Privacera Platform
- Customize topic and table names on Privacera Platform
- Enable/Disable Discovery Consumer Service in Privacera Manager for AWS/Azure/GCP on Privacera Platform
- Enable Discovery on PrivaceraCloud
- Scan resources
- Supported file formats for Discovery Scans
- Privacera Discovery scan targets
- Processing order of scan techniques
- Register data sources on Privacera Platform
- Data sources on Privacera Platform
- Add a system data source on Privacera Platform
- Add a resource data source on Privacera Platform
- Add AWS S3 application data source on Privacera Platform
- Add Azure ADLS data source on Privacera Platform
- Add Databricks Spark SQL data source on Privacera Platform
- Add Google BigQuery (GBQ) data source on Privacera Platform
- Add Google Pub-Sub data source on Privacera Platform
- Add Google Cloud Storage data source on Privacera Platform
- Set up cross-project scanning on Privacera Platform
- Google Pub-Sub Topic message scan on Privacera Platform
- Add JDBC-based systems as data sources for Discovery on Privacera Platform
- Add and scan resources in a data source
- Start a scan
- Start offline and realtime scans
- Scan Status overview
- Cancel a scan
- Trailing forward slash (/) in data source URLs/URIs
- Configure Discovery scans
- Tags
- Dictionaries
- Types of dictionaries
- Dictionary Keys
- Manage dictionaries
- Default dictionaries
- Add a dictionary
- Import a dictionary
- Upload a dictionary
- Enable or disable a dictionary
- Include a Dictionary
- Exclude a dictionary
- Add keywords to an included dictionary
- Edit a dictionary
- Copy a dictionary
- Export a dictionary
- Search for a dictionary
- Test dictionaries
- Dictionary tour
- Patterns
- Models
- Rules
- Configure scans
- Scan setup
- Adjust default scan depth on Privacera Platform
- Classifications using random sampling on PrivaceraCloud
- Enable Discovery Realtime Scanning Using IAM Role on PrivaceraCloud
- Enable Real-time Scanning on ADLS Gen 2 on PrivaceraCloud
- Enable Real-time Scanning of S3 Buckets on PrivaceraCloud
- Connect ADLS Gen2 Application for Data Discovery on PrivaceraCloud
- Include and exclude resources in GCS
- Configure real-time scan across projects in GCP
- Enable offline scanning on ADLS Gen 2 on PrivaceraCloud
- Include and exclude datasets and tables in GBQ
- Google Sink to Pub/Sub
- Data zones on Privacera Platform
- Planing data zones on Privacera Platform
- Data Zone Dashboard
- Enable data zones on Privacera Platform
- Add resources to a data zone on Privacera Platform
- Create a data zone on Privacera Platform
- Edit data zones on Privacera Platform
- Delete data zones on Privacera Platform
- Import data zones on Privacera Platform
- Export data zones on Privacera Platform
- Disable data zones on Privacera Platform
- Create tags for data zones on Privacera Platform
- Data zone movement
- Data zones overview
- Configure data zone policies on Privacera Platform
- Encryption for Right to Privacy (RTP) on Privacera Platform
- Workflow policy use case example
- Define Discovery policies on Privacera Platform
- Disallowed Groups policy
- Disallowed Movement Policy
- Compliance Workflow policies on Privacera Platform
- De-identification policy
- Disallowed Subnets Policy
- Disallowed Subnet Range Policy
- Disallowed Tags policy
- Expunge policy
- Disallowed Users Policy
- Right to Privacy policy
- Workflow Expunge Policy
- Workflow policy
- View scanned resources
- Discovery reports and dashboards
- Alerts Dashboard
- Discovery Dashboard
- Built-in reports
- Offline reports
- Saved Reports
- Reports with the Query Builder
- Discovery Health Check
- Set custom Discovery properties on Privacera Platform
- Get started with Discovery
- Encryption
- Get started with Encryption
- The encryption process
- Encryption architecture and UDF flow
- Install Encryption on Privacera Platform
- Encryption on Privacera Platform deployment specifications
- Configure Ranger KMS with Azure Key Vault on Privacera Platform
- Enable telemetry data collection on Privacera Platform
- AWS S3 bucket encryption on Privacera Platform
- Set up PEG and Cryptography with Ranger KMS on Privacera Platform
- Provide user access to Ranger KMS
- PEG custom properties
- Enable Encryption on PrivaceraCloud
- Encryption keys
- Master Key
- Key Encryption Key (KEK)
- Data Encryption Key (DEK)
- Encrypted Data Encryption Key (EDEK)
- Rollover encryption keys on Privacera Platform
- Connect to Azure Key Vault with a client ID and certificate on Privacera Platform
- Connect to Azure Key Vault with Client ID and Client Secret on Privacera Platform
- Migrate Ranger KMS master key on Privacera Platform
- Ranger KMS with Azure Key Vault on Privacera Platform
- Schemes
- Encryption schemes
- Presentation schemes
- Masking schemes
- Scheme policies
- Formats
- Algorithms
- Scopes
- Deprecated encryption schemes
- About LITERAL
- User-defined functions (UDFs)
- Encryption UDFs for Apache Spark on PrivaceraCloud
- Hive UDFs for encryption on Privacera Platform
- StreamSets Data Collector (SDC) and Privacera Encryption on Privacera Platform
- Trino UDFs for encryption and masking on Privacera Platform
- Privacera Encryption UDFs for Trino
- Prerequisites for installing Privacera crypto plugin for Trino
- Install the Privacera crypto plugin for Trino using Privacera Manager
- privacera.unprotect with optional presentation scheme
- Example queries to verify Privacera-supplied UDFs
- Privacera Encryption UDFs for Starburst Enterprise Trino on PrivaceraCloud
- Syntax of Privacera Encryption UDFs for Trino
- Prerequisites for installing Privacera Crypto plug-in for Trino
- Download and install Privacera Crypto jar
- Set variables in Trino etc/crypto.properties
- Restart Trino to register the Privacera encryption and masking UDFs for Trino
- Example queries to verify Privacera-supplied UDFs
- Privacera Encryption UDF for masking in Trino on PrivaceraCloud
- Databricks UDFs for Encryption
- Create Privacera protect UDF
- Create Privacera unprotect UDF
- Run sample queries in Databricks to verify
- Create a custom path to the crypto properties file in Databricks
- Create and run Databricks UDF for masking
- Privacera Encryption UDF for masking in Databricks on PrivaceraCloud
- Set up Databricks encryption and masking
- Get started with Encryption
- API
- REST API Documentation for Privacera Platform
- Access Control using APIs on Privacera Platform
- UserSync REST endpoints on Privacera Platform
- REST API endpoints for working tags on Privacera Platform
- PEG REST API on Privacera Platform
- API authentication methods on Privacera Platform
- Anatomy of the /protect API endpoint on Privacera Platform
- Construct the datalist for protect
- Deconstruct the datalist for unprotect
- Example of data transformation with /unprotect and presentation scheme
- Example PEG API endpoints
- /unprotect with masking scheme
- REST API response partial success on bulk operations
- Audit details for PEG REST API accesses
- REST API reference
- Make calls on behalf of another user on Privacera Platform
- Troubleshoot REST API Issues on Privacera Platform
- Encryption API date input formats
- Supported day-first date input formats
- Supported month-first date input formats
- Supported year-first date input formats
- Examples of supported date input formats
- Supported date ranges
- Day-first formats
- Date input formats and ranges
- Legend for date input formats
- Year-first formats
- Supported date range
- Month-first formats
- Examples of allowable date input formats
- PEG REST API on PrivaceraCloud
- REST API prerequisites
- Anatomy of a PEG API endpoint on PrivaceraCloud
- About constructing the datalist for /protect
- About deconstructing the response from /unprotect
- Example of data transformation with /unprotect and presentation scheme
- Example PEG REST API endpoints for PrivaceraCloud
- Audit details for PEG REST API accesses
- Make calls on behalf of another user on PrivaceraCloud
- Apache Ranger API on PrivaceraCloud
- API Key on PrivaceraCloud
- Clear Ranger's authentication table
- Administration and Releases
- Privacera Platform administration
- Portal user management
- Change password for Privacera Platform services
- Generate tokens on Privacera Platform
- Enable underscores in NGINX
- Validations on Privacera Platform
- Health check on Privacera Platform
- Event notifications for system health
- Export or import a configuration file on Privacera Platform
- Logs on Privacera Platform
- Increase Privacera Platform portal timeout for large requests
- Platform Support Policy and End-of-Support Dates
- Enable Grafana metrics on Privacera Platform
- Enable Azure CLI on Privacera Platform
- Migrate from Databricks Spark to Apache Spark
- Migrate from PrestoSQL to Trino
- Ranger Admin properties on Privacera Platform
- Basic steps for blue/green upgrade of Privacera Platform
- Event notifications for system health
- Metrics
- Get ADLS properties
- PrivaceraCloud administration
- About the Account page on PrivaceraCloud
- Generate token, access key, and secret key on Privacera Platform
- Statistics on PrivaceraCloud
- PrivaceraCloud dashboard
- Event notifications for system health
- Metrics
- Usage statistics on PrivaceraCloud
- Update PrivaceraCloud account info
- Manage PrivaceraCloud accounts
- Create and manage IP addresses on PrivaceraCloud
- Scripts for AWS CLI or Azure CLI for managing connected applications
- Add UserInfo in S3 Requests sent via Data Access Server on PrivaceraCloud
- Previews
- PrivaceraCloud previews
- Preview: Scan Electronic Health Records with NER Model
- Preview: File Explorer for GCS
- Preview: File Explorer for Azure
- Preview: OneLogin setup for SAML-SSO
- Preview: File Explorer for AWS S3
- Preview: PingFederate UserSync
- Preview: Azure Active Directory SCIM Server UserSync
- Preview: OneLogin UserSync
- Privacera UserSync Configuration
- Preview: Enable Access Management for Vertica
- Privacera Platform previews
- Preview: AlloyDB connector for PolicySync
- Configure AWS Lake Formation on Privacera Platform
- Get started with AWS Lake Formation
- Create IAM Role for AWS Lake Formation connector for Platform
- Configure AWS Lake Formation connector on Privacera Platform
- Create AWS Lake Formation connectors for multiple AWS regions for Platform
- Setup audit logs for AWS Lake Formation on Platform
- How to validate a AWS Lake Formation connector
- AWS Lake Formation FAQs for Pull mode
- AWS Lake Formation FAQs for Push mode
- AWS Lake Formation Connector Properties
- PrivaceraCloud previews
- Release documentation
- Previous versions of Privacera Platform documentation
- Privacera Platform Release Notes
- PrivaceraCloud Release Notes
- Privacera system security initiatives
- Privacera Platform administration
Connect to Azure Key Vault with a client ID and certificate on Privacera Platform
To configure a connection to the Azure Key Vault with ID and Certificate:
Follow the same steps as in Generate the Client ID in the topic Connect to Azure Key Vault with Client ID and Client Secret on Privacera Platform.
Go to the Key Vault generated and select the Certificates>Generate/Import.
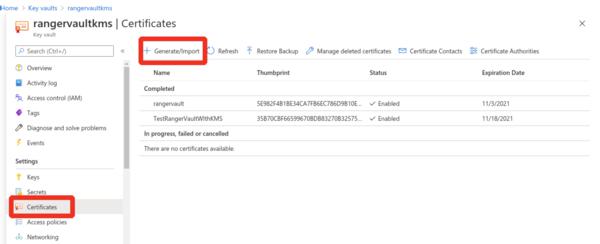
You have the option to generate a certificate outside the vault and import it here.
Select Generate to generate a certificate.
Enter the certificate details as shown below:
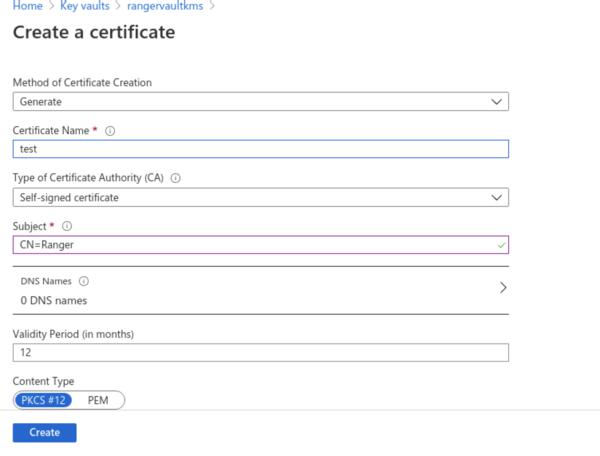
In the example shown, a certificate 'test' is generated.
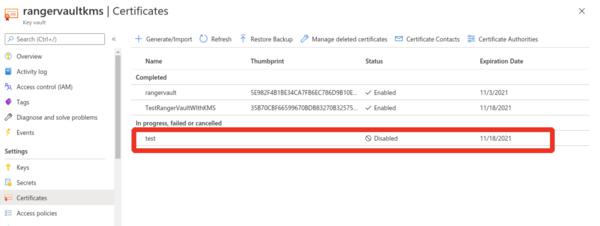
Click on the certificate that is disabled and enable it.
Click open the certificate and download it.
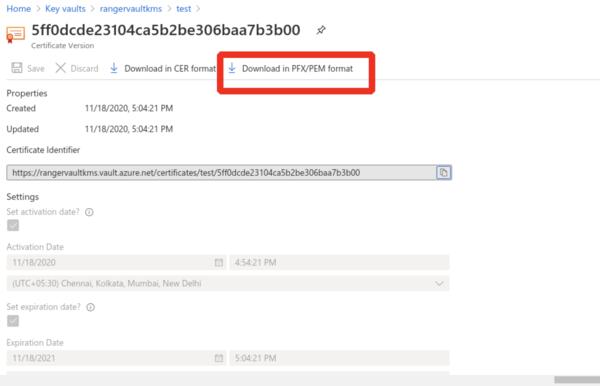
Download the certificate and. copy the certificate to the SSL folder: ~/privacera/privacera-manager/config/ssl/.
Open the certificate and delete the private key and save the public certificate as shown in this example:
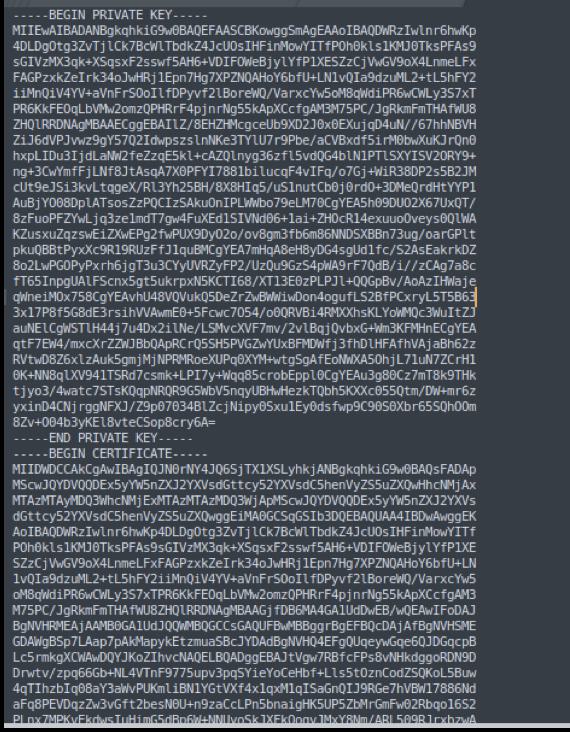
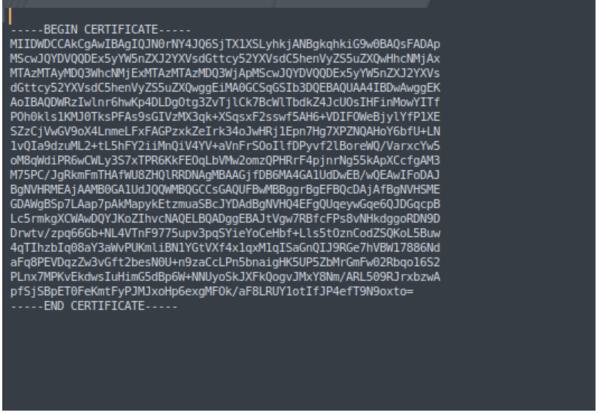
Upload the certificate to the Azure application that was created as follows:
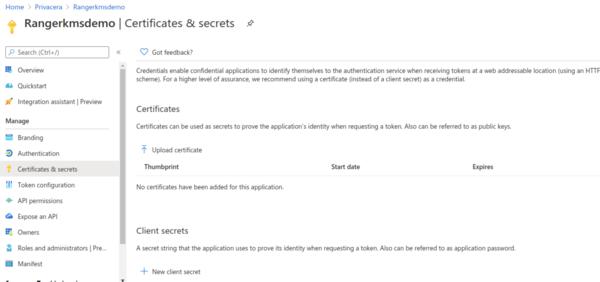
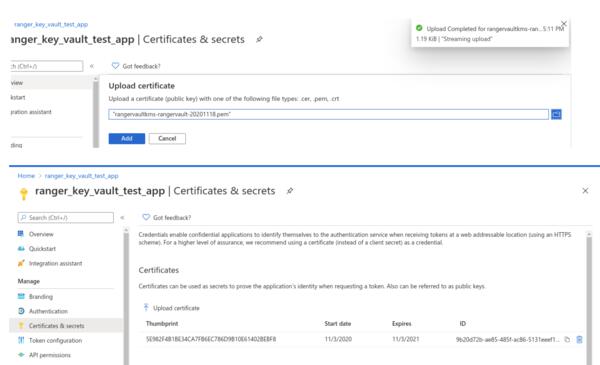
Go the Key vault that was created and click on Access Policies.
Follow the instructions in Add the Access Policy.
Note
The certificate path should be as it is show in the ranger/kms/install.properties and cannot change. Also, if you need a password for the certificate, add it in the .properties file. All fields in the .properties file are required and cannot be removed. Value can be null/dummy.
